


Here's the article section. This is the place where different thoughts, discoveries and other stuff is posted
if not connected to the current development. It might be overkill to call it articles since it can be just short notes
or code snippets........but here it is anyway! I hope it is useful!
Downloading and using the correct Windows SDK
I discovered the other day that I was using an old Windows SDK during my development. I thought
I was using the latest one, because I have installed it, but that may not be true at all. I thought the installation
process handled the switch automagically but at least I was using an old version. It seemed like the Windows
SDK used environment variables to control the version because in Visual Studio the directories for includes and
such are controlled by a $(WindowsSdkDir) variable. Simple! I'll change that in a snap! Well, at least I
thought so...But it isn't that simple, things are stored in the registry as well.
But first you have to download the correct SDK. I was in a bit of hurry and of course I downloaded the incorrect
one, the 32-bit one instead of the 64-bit version I needed. So, Microsoft actually have a good page here that
helps you to choose the correct version. I prefer to download the ISO version and burn it to a DVD so I have
it handy for other computers if I need it.
When it comes to choosing the SDK version to use, you can run the Windows SDK Configuration Tool
(WindowsSdkVer.exe) in the Setup folder of your SDK installation after installation to be sure that you use that
version in Visual Studio, as shown below:

But it doesn't stop there. If you have installed Visual Studio 2008 service pack 1 on the non-Express
Visual Studio version the tool will not work. Then you'll need to have a look at a post here.
Happy coding!
Using your own symbol server without Internet connection
Your own symbol server can be valuable if you ever debug using a debugger.
It's pretty easy to setup your own symbol server if you want to, and you can add both Microsoft public
symbols as well as your own. I'm going to show how to setup a symbol server with the public Microsoft symbols
without an existing Internet connection on your developer computer, and how to use it with a debugger such as WinDbg.
First download the Debugging tools for Windows and install it. If you are going to debug both 32-bit and 64-bit
applications you will need to download and install both packages, because the 32-bit WinDbg can only debug
32-bit applications and vice versa.
Create a target directory where local copies of used symbols can be stored, in this example we will use D:\Symbols.
Download any public Microsoft symbols you'll need, they are currently available here. If you plan to install other
operating system symbols then the ones for Windows 7 you'll need a temporary directory for symbol storage as well,
since the pre-Windows 7 symbols are stored in another directory structure. We will call this directory D:\symin in this
example. Remember that this symbol storage can use some space, I have a symbol server set up for operating systems
XP, Vista, Win 7, Windows Server 2003 and 2008 (both x86 and x64 with servicepacks) and this takes something like
15 Gb, and then I still don't count all the hotfixes that has been released!
Start installing one of the symbol packages you downloaded from Microsoft. If it is a Windows 7 symbol package you
can extract it to the target directory directly (D:\Symbols in my case).A Windows 7 symbol package is already in the correct
format,
so you don't have to do anything else with it. If it is a pre-Windows 7
symbol package you'll extract it to the temporary
directory first (D:\symin in my case) and run the following command from a command prompt in the debugging tools
installation directory:
symstore add /r /f d:\symin\*.* /s D:\Symbols /t "xxx"
An explanation of the symstore command-line options can be found here.
NOTE: The "xxx" string after /t tells you what kind of symbols you're addding to the symbol store. So change this string
to anything you can identify the symbols with. If you're adding the XP SP3 x86 symbols it's a good thing to write it here.
The computer works for a while and when it has completed the symbols have been added to the symbol server store at
D:\Symbols. You can now clean up the temporary storage at D:\symin and continue with any remaining symbol installations
by repeating the procedure over again.
NOTE: Symstore does not support simultaneous transactions from multiple users. It is recommended that one user is
designated administrator of the symbol store and responsible for all transactions.
NOTE: Both public and private symbols of the same file can not be stored in the same symbol store because they both
contain the same signature and age.
To use a debugger such as WinDbg you just point the symbol search path to your symbol directory:
Start WinDbg. Click File | Symbol File Path... and type in:
"srv*D:\Symbols"
Don't forget to save your workspace so you don't have to type it in every time. Happy debugging!
Using your own symbol server with Internet connection
Your own symbol server can be valuable if you ever debug using a debugger.
It's pretty easy to setup your own symbol server if you want to, and you can add both Microsoft public
symbols as well as your own. I'm going to show how to setup WinDbg with the public Microsoft symbol server.
First download the Debugging tools for Windows and install it. If you are going to debug both 32-bit and 64-bit
applications you will need to download and install both packages, because the 32-bit WinDbg can only debug
32-bit applications and vice versa.
Create a target directory where local copies of used symbols can be stored, in this example we will use D:\Symbols.
After the debugging tools installation you start WinDbg. Click File | Symbol File Path... and type in:
"srv*D:\Symbols*http://msdl.microsoft.com/download/symbols" as shown below:

The first part is where on your computer the symbol files will be stored when they are downloaded from Microsoft
and the second part is the download path to the Microsoft public symbols. Any symbol files downloaded in this
example are stored at D:\Symbols for future use. Whenever a symbol file is needed the local directory is checked first,
and if it not was found it is downloaded from the public Microsoft symbol server. Don't forget to save your workspace so
you don't have to type it in every time. Happy debugging!
Add your own symbol files to a symbol server store
You may not know it, but symbol files are created by the compiler. So it's an easy step to add your own symbol files
to a symbol store.
First download the Debugging tools for Windows and install it. If you are going to debug both 32-bit and 64-bit
applications you will need to download and install both packages, because the 32-bit WinDbg can only debug
32-bit applications and vice versa.
Run the following command from a command prompt in the debugging tools installation directory. In this example
we assume that your project/solution is located in D:\MyApp and that the symbol store is located in D:\Symbols:
symstore add /r /f D:\MyApp\*.* /s D:\Symbols /t "Product Name" /v "Product Version" /c "Transaction comment"
As you may guess the strings "Product Name", "Product Version" and "Transaction coment" should match the actual
product name, version and comment you may want to use in your specific case. Happy debugging!
Connecting Visual Studio to a symbol server
Microsoft Visual Studio 2008 SP1 connects to the Microsoft public symbol servers automatically when you click Load symbols
from Microsoft symbol servers in the Options dialog box (Debugging category, Symbols page) or the shortcut menu (in the
Modules Window of Call Stack Window).
To set a path to a symbol server in Visual Studio you follow these steps:
Click Tools | Options.
Open the Debugging node and click Symbols.
Add the new path to the symbol server. If you want to use the Microsoft public symbol server you type:
http://msdl.microsoft.com/download/symbols
If you have a UNC path to a server on the network just type:
\\server\share
If you have the symbol server on your local computer just type the location of them, like:
D:\Symbols
Happy debugging!
Using the HTML5 video tag
Recently I started to investigate how I could use the HTML5 video tag to show my animations directly on
the download page without using any plugin. Not in full size ofcourse, more like a kind of thumbnail.
It was quite simple to accomplish, but I still want to share some tips.
Check if you can create Ogg Theora video files (.ogv, the ogm doesn't seem to be the same format so you can't
just rename it). If you need a converter you can download a command-line converter for Linux, MacOS and
Windows with the name Ffmpeg2Theora from here. Then I just use it to convert my animation to an Ogg Theora
video file (ogv). To create the thumbnail video in the downloads section I just typed:
ffmpeg2theora -x 176 -y 144 input.avi
This command converted my video input.avi to the size 176 * 144 from it's original size and called it input.ogv.
I recommend using sizes with multiples of 16 to keep the stream optimized. Ffmpeg2Theora has lot of options
to use so check it out on the command line, you can also find some examples here. Upload the ogv file to your site.
Then you have to modify your .htaccess file. If you don't have one you can create one in the same directory as the
ogv file and put this in it:
AddType video/ogg .ogv
AddType application/ogg .ogg
The last thing to do is to actually add the HTML5 video tag in your home page where you want it, and with
the options you like. There are also options to use a fallback if you want to, but I have chosen not to do it.
Good luck!
More on DirectX application memory debugging
I noticed the other day that my application had memory leaks so it had to be dealt with. I am going to show
this real-world case as an example on how to use different tools for DirectX debugging. Several of them have
been mentioned earlier like DbgView and PIX. They are both going to action in this case. Before you start debugging
DirectX applications you need to do these things:
Turn on DirectX debug runtime in the DirectX Control Panel:
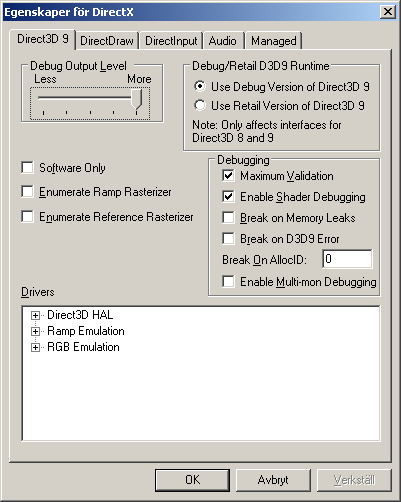
Set the radio button on the debug version and crank up the output level to the max. As you
may notice there are some other interesting options here as well, like the break on memory
leaks, errors and AllocID, but I am not going to show them this time. For example you can
use the AllocID to set a breakpoint on a specific memory allocation, that's useful.
You also have to add a few things to the source code. Add these includes:
#define D3D_DEBUG_INFO //Enable enhanced D3D debugging in debug mode
#define _CRTDBG_MAP_ALLOC //Enable memory leak detection
#if defined (DEBUG) | defined (_DEBUG) //If debug build is used
#include <stdlib.h>
#include <crtdbg.h> //Include declaration for _CrtSetDbgFlag
#endif
Also add these lines at the start of your WinMain:
// Add general-purpose memory leak detection for debug builds
#if defined (DEBUG) | defined (_DEBUG) //If debug version is used
_CrtSetDbgFlag (_CRTDBG_ALLOC_MEM_DF | _CRTDBG_LEAK_CHECK_DF); //Set debug flags
#endif
Compile and link your application with the Debug configuration. Start up DbgView then run your application.
Let it run and then exit it. Return to DbgView where you should find the debug output from your application.
It can look something like this:
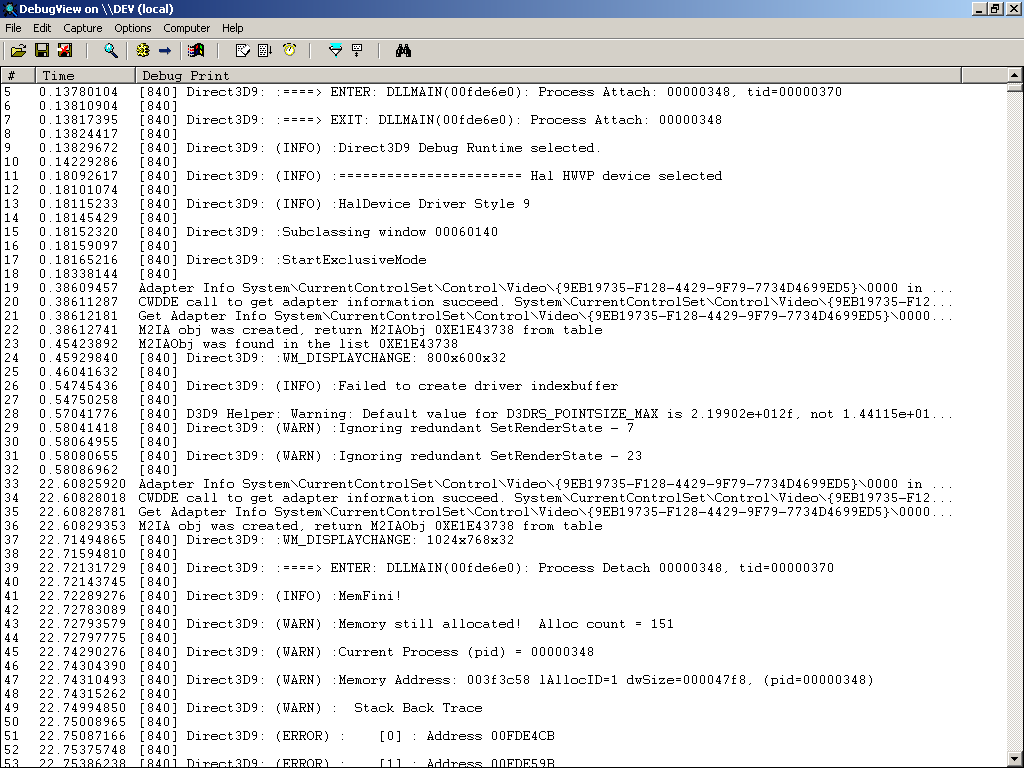
One thing to notice here is line #43 where we can see that we have 151 allocations that not are handled correctly!
Wow, that's not too good. Actually, this is not as bad as it seems. When something isn't released correctly that in turn
stops other things to be released which in turn stops other things from being released....Well, you get the picture.
Other things to notice here is lAllocID on #47 and the size of the allocated data in dwSize on the same row. The
size can be a clue what we have to look for and the lAllocID is the same AllocID as we saw previously in the
DirectX Control Panel. So if we change the 0 in the DirectX Control Panel to break on AllocID 1 and run
a debug on the application in Visual Studio we get a breakpoint on the allocation. Sweet! Unfortunately this will
not help us much in this case, since the AllocID is very early in the code, it is the DirectX device that still has references
and can not be closed, so this is not what we're looking for. Something else we notice is redundant render states
on #29 and 31. This is useful when we start optimizing. But back to the memory errors...
So what are we going to do? We fire up PIX. This is an excellent tool for debugging and optimizing/profiling your
DirectX application. I recommend that you check out what it has to offer, it's very capable. So we start up PIX and
clicks on the new icon:
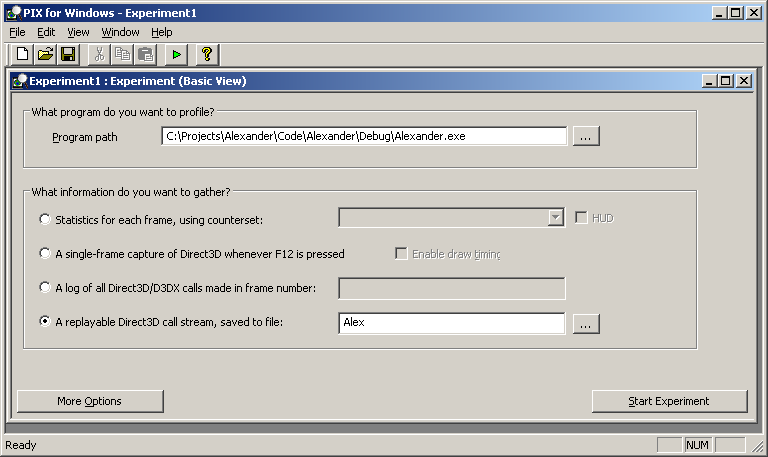
Here we set the application we want to profile, your DirectX application. Select a replayable call stream and set a name.
Notice where the file is going to be saved since it may be quite big so you may want to delete it when done. Then just click
the Start Experiment button and your application should start. Run it as before and quit. After a while you will get a screen
similar to this:
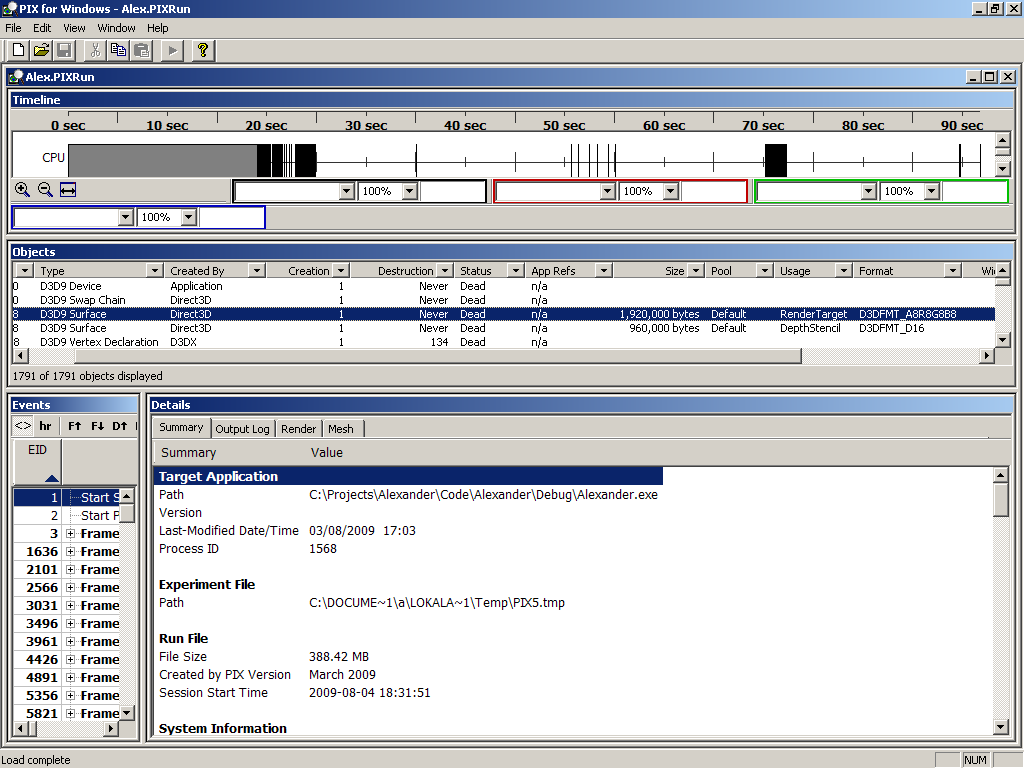
Here we have loads of information. For now the most interesting stuff is in the Objects window in the middle. There
we
have all objects we use and in the Destruction field we can see some
entries marked Never: Depth stencil, render target, a swap
chain and the device. Things are clearing up a bit but we still don't know for sure. The events window to the left show all
frames with calls made and references to the objects in the objects window are shown when you click on the different frames.
So we simply go to the last recorded frame and it looks like this after I filtered the object window on Destruction: Never:
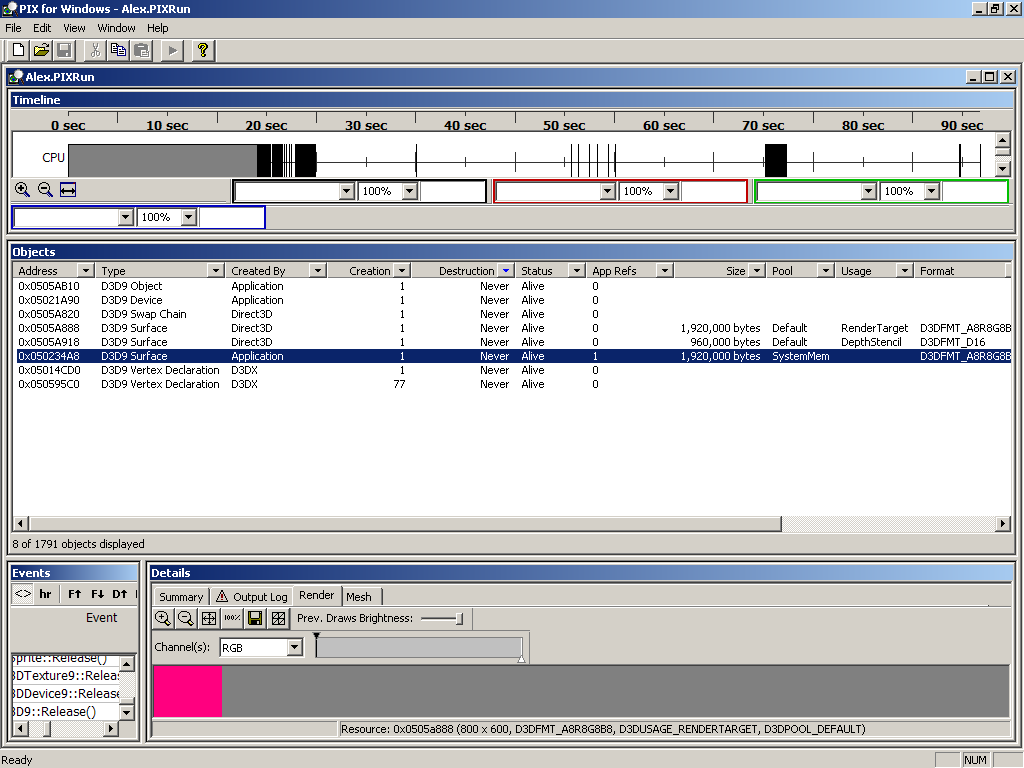
Here you can notice that the highlighted row in the objects window is the only object that still have a reference in the App
Refs column. We have found it! With this information it is quite easy to fix the bug: A surface pointer that allocated a surface
twice, by mistake. This single mistake caused the 151 leaks....
This is just a small piece of what PIX have to offer, make sure you check it out!
Using reference tones to synchronize sound
If you want to synchronize a sound effect with the length of a tiled animation you quickly notice that it
isn't always easy to estimate the length of the sound. My solution was to create a number of reference sounds
in 440 Hz with lengths from 0.1 seconds to 3.0 seconds. You can quickly insert a reference sound and switch
to a longer or shorter one until the correct length is found. If you want to use them they are available in the
download section.
Visual studio effect file integration
As you might now the fixed graphics pipeline is moving out from DirectX, and is replaced with shaders.
Maybe you have already started working with them. Have you ever wished you had integration with them
in Visual Studio? Well, you can fix that with a rule file located here.
Directx 9 Fixed graphics pipeline
I know, the fixed graphics pipeline is moving out from DirectX, but I still use it from time to time.
Sometimes I wished I had a graphics pipeline overview. Luckily the author of the book "The
Direct3D Graphics Pipeline" Richard Thomson has published an excellent overview on his site.
You can find the DirectX 9 pipeline poster here.
Playing an avi movie located in memory
There may be situations where you would like to play an animation already loaded into
memory to the screen. The following code shows how to play an animation from memory
using MMIO functions. It might not be an optimal solution at all times, but it works. We
make it possible by writing a custom MMIO handler and install it. This custom handler
passes the data for the streams and at the end we uninstall the custom handler. Let's begin
with the "main" code. Note that g_pAnim is a global pointer to the memory location and
dwAnimSize is the size of the animation:
UPDATE: I tested this code on Windows 7 x64 and it behave somewhat different then on XP that
it was written for in the beginning. It still work but the window isn't maximized as on XP. This is probably
easy to fix, but I haven't really tried to do it.
// The PlayAnimation function below plays an animation pointed by g_pAnim
// until the end of animation. The function uses windows multimedia and installs
// a custom MMIO procedure for reading the AVI file from the pointer in memory.
void FX_PlayAnimation (void)
{
MCIERROR MCIErr;
//Result returned from play
LPMMIOPROC lpMMIOProc;
//Pointer to the custom installed MMIO procedure
char szMCICommand[100]; //MCI command string
if (g_pAnim==NULL) return; //Check for NULL pointer
// Prepare the window handle command, which have to include the window handle that
// we redirect video output to. By default MCI opens a window of it own, but I can't
// manage to play the animation in fullscreen in it.
sprintf_s ((char*)&szMCICommand,_countof (szMCICommand),
"window test handle %d\0",Init.hwnd);
lpMMIOProc=mmioInstallIOProc //Install a custom MMIO procedure
(mmioFOURCC ('Z','Y','K',' '), //Four character code for installed procedure
(LPMMIOPROC)FX_AnimIO,
//Pointer to callback procedure
MMIOFLAGS);
//Flags for installing the procedure
if
(lpMMIOProc==NULL)
//If custom MMIO procedure install failed
AppError (10,0);
//Call error function
MCIErr=mciSendString
//Send an open "file" call to the avi file
((LPCSTR)"open test.ZYK+ type avivideo alias test\0", //Open with custom procedure with alias
NULL,
//No buffer with returning info is needed
0,
//Buffersize for return buffer
NULL);
//No callback is needed
if (MCIErr) AppError (11,0); //Call error function if failed
MCIErr=mciSendString
//Send a window command
((LPCSTR)&szMCICommand,
//Window command with HWND handle
NULL,
//No buffer with returning info is needed
0,
//Buffersize for return buffer
NULL);
//No callback is needed
if (MCIErr) AppError (48,0); //Call error function if failed
SetCursor (NULL);
//Remove mouse cursor from animation window
MCIErr=mciSendString
//Send a cue command
((LPCSTR)"cue test output\0", //Send a cue command to prepare output
NULL,
//No return buffer with returning info is needed
0,
//Buffer size for return buffer
NULL);
//No callback is needed
if (MCIErr) AppError (61,0); //Call error function if failed
MCIErr=mciSendString
//Send a play command to the opened avi "file"
((LPCSTR)"play test wait\0", //Play command, wait until finished. Fullscreen?
NULL,
//No buffer with returning info is needed
0,
//Buffersize for return buffer
NULL);
//No callback is needed
if (MCIErr) AppError (13,0); //Call error function if failed
MCIErr=mciSendString
//Send close command to the avi "file"
((LPCSTR)"close test\0", //Close command
NULL,
//No buffer with returning info is needed
0,
//Buffersize for return buffer
NULL);
//No callback is needed
if (MCIErr) AppError (16,0); //Call error function if failed
lpMMIOProc=mmioInstallIOProc //Remove the custom MMIO procedure
(mmioFOURCC ('Z','Y','K',' '), //Four character code for installed procedure
NULL,
//Pointer is NULL, we are removing procedure
MMIO_REMOVEPROC);
//Flags for removing procedure
if
(lpMMIOProc==NULL)
//If custom MMIO procedure remove failed
AppError (17,0);
//Call error function
}
And the callback that passes the data looks like this:
// The function below is the callback routine for reading
// AVI files from memory through Windows multimedia. The
// normal Windows Multimedia functions are simulated, and
// all operations with the specified type are handled through
// this callback routine.
LRESULT CALLBACK FX_AnimIO (
LPMMIOINFO lpMMIOInfo,
//MMIO structure
UINT uiMessage,
//MMIO command to process by callback
LPARAM lParam1,
//Parameter 1
LPARAM lParam2)
//Parameter 2
{
static bool bAlreadyOpen=FALSE; //Keep track if already opened
switch
(uiMessage)
//Check what type of operation to do
{
case
MMIOM_OPEN:
//Open avi memory file
if (bAlreadyOpen) return 0; //Check if already opened
bAlreadyOpen=TRUE;
//Set open flag
if (lpMMIOInfo==NULL) return -1; //Check for NULL pointer
lpMMIOInfo->lDiskOffset=0; //Set offset to start of "file"
return
0;
//We are done, return
break;
case
MMIOM_READ:
//Reading avi "file"
memcpy ((void *)lParam1,g_pAnim+lpMMIOInfo->lDiskOffset,lParam2); //Copy the data
lpMMIOInfo->lDiskOffset=lpMMIOInfo->lDiskOffset+lParam2; //Set new disk offset
return (lParam2); //We are done, return
break;
case
MMIOM_CLOSE:
//Closing the "file"
return
0;
//Return to caller
break;
case
MMIOM_SEEK:
//Seek within the "file"
switch (lParam2) //Check what type of seek
{
if (lpMMIOInfo==NULL) return -1; //Check for NULL pointer
case SEEK_SET: //Seek set position
lpMMIOInfo->lDiskOffset=(long)lParam1; //Set new position
break;
case SEEK_CUR: //Seek from current position
lpMMIOInfo->lDiskOffset+=(long)lParam1; //Set new position
break;
case SEEK_END: //Seek to end
lpMMIOInfo->lDiskOffset=((long)dwAnimSize)-lParam1-1;
break;
}
if (lpMMIOInfo==NULL) return -1; //Check for NULL pointer
return lpMMIOInfo->lDiskOffset; //Return the new offset
break;
default: AppError (22,0); //Call error function, unknown command
}
return
-1;
//Return error if reached here
}
Last but not least we have an include for the MMIO flags as well:
// Flags for installing custom MMIO procedure:
#define MMIOFLAGS MMIO_INSTALLPROC | MMIO_GLOBALPROC
Timing is all!
Measuring of the elapsed time is an important step in a game. Its is used to control the speed
of the game and it's different components. Note that not all components have to use the same
speed, different tasks can be performed with different time intervals. There are several ways to
check for time in a Windows system, and some are more suited for games then others.
I recommend using the QueryPerformanceFrequency and QueryPerformanceCounter calls
for your timing. They are easy to use, exist on Pentium and forward processors and give a high
resolution suitable for your needs. The following code snippet shows how to check for the
availability of this timer:
// The Timer_QuerySpeed function checks how many timer ticks the
// computer makes per second. It is stored in the timing structure
// and is used for general game timing.
void Timer_QuerySpeed (void)
{
BOOL bSupported;
//Set if the hardware supports a QueryPerformanceFrequency call
bSupported=QueryPerformanceFrequency ((LARGE_INTEGER*)&(Timing.liCountPerSec)); //Query speed
if
(!bSupported)
//The hardware didn't support a QueryPerformanceFrequency call
AppError (51,0);
//Call error function
Timing.fSecsPerCount=1.0f/(float)Timing.liCountPerSec; //Calculate seconds per timer tick
}
Optimizing DirectX drawing throughput
It is not always simple to push the most of your DirectX application, but there are a few guidelines
to keep in mind during development. I am going to give a few tips on optimization:
- Keep polygon count down.
- Only clear when you have to.
- Batch primitives/draws.
- Keep down the number of state changes.
- Test performance often.
- Keep it simple and advance if frame rate is acceptable.
- Keep textures as small as possible, keep them square and in power of 2 sizes.
- Use as few light sources as possible.
Debugging DirectX applications
Debugging DirectX applications is not always an easy task. There are a few different ways to debug,
and they are chosen depending on the situation. A simple way is to print data you are interested in to
the screen or a file, but it may be very tedious. You can also step in the debugger or set breakpoints
of course. Another way is to turn on debug information on in DirectX. Set debug output to maximum
in the DirectX control panel. This debug information is printed in the output window in the IDE (at least
for Visual Studio). Microsoft has also released a good standalone application for getting these debug
messages called DbgView. I like it and use it from time to time. You can even connect to a remote
computer. Start it, start the logging and then start your application. The messages are now logged.
Another really good tool from Microsoft included in the SDK is PIX. Use it to get different performance
counters from your application. You can even trig user defined events in PIX by using the D3DPERF_BeginEvent
and D3DPERF_EndEvent calls. Don't forget to check out the other tools included in the DirectX SDK.
Good luck in your debugging!
Using custom font resources without installing them
When you're making a game you want it's appearance to be as good as possible, including the text that is
displayed. There are a number of ways to display text, like bitmapped fonts or TrueType fonts used in many
"ordinary" applications of today. But wait, if I make a TrueType font for my game I have to install it on the
players computer and then use it, I don't want that. No you don't have to. You can load your fonts into memory and
use a call to AddFontMemResourceEx. Just take a look at the code below:
Fonts.hMainFont=AddFontMemResourceEx ( //Add font resource from memory to the system
pFont,
//Pointer to font resource in memory
Fonts.dwMainFontSize,
//Font size of font to add
0,
//Reserved, must be zero
&dwNumFonts);
//Pointer to number of fonts to install
Simple, huh? Just don't forget to call RemoveFontMemResourceEx after you finished using it. Also note that this
call is only included in Windows 2000 and later, so you have to build your binary with with WINVER and
_WIN32_WINNT defined to 0x0500 minimum.
Mapping virtual key codes to clear text
In my current game under development I wanted a routine where the user chooses key combinations and the
pressed keys are presented on screen as clear text. If the player pressed space for jump I wanted it to write out
"Space" on the screen. How should I solve that? It was clear that I needed a virtual key to clear text conversion
table. And here it is:
// The cKeytable is a string table to keep track of what string to write on screen
// when the user presses a key with the corresponding virtal key code value when
// choosing keys for controls. This means that virtual keycode x is described by
// cKeytable[x] string.
char cKeytable[256][25]={
"\0", "LEFT MOUSE BUTTON\0", "RIGHT MOUSE BUTTON\0", "\0", "MIDDLE MOUSE BUTTON\0",
"X1 MOUSE BUTTON\0", "X2 MOUSE BUTTON\0", "\0", "BACKSPACE\0", "TAB\0",
"\0", "\0", "CLEAR\0", "ENTER\0", "\0", "\0", "SHIFT\0", "CTRL\0", "ALT\0",
"PAUSE\0", "CAPS LOCK\0", "\0", "\0", "\0", "\0", "\0", "\0", "ESCAPE\0", "\0",
"\0", "\0", "\0", "SPACEBAR\0", "PAGE UP\0", "PAGE DOWN\0", "END\0", "HOME\0",
"LEFT ARROW\0", "UP ARROW\0", "RIGHT ARROW\0", "DOWN ARROW\0", "SELECT\0", "PRINT\0",
"EXECUTE\0", "PRINT SCREEN\0", "INSERT\0", "DELETE\0", "HELP\0", "0\0", "1\0", "2\0",
"3\0", "4\0", "5\0", "6\0", "7\0", "8\0", "9\0", "\0", "\0", "\0", "\0", "\0", "\0",
"\0", "A\0", "B\0", "C\0", "D\0", "E\0", "F\0", "G\0", "H\0", "I\0", "J\0", "K\0",
"L\0", "M\0", "N\0", "O\0", "P\0", "Q\0", "R\0", "S\0", "T\0", "U\0", "V\0", "W\0",
"X\0", "Y\0", "Z\0", "LEFT WIN KEY\0", "RIGHT WIN KEY\0", "APPLICATIONS KEY", "\0",
"COMPUTER SLEEP\0", "KEYPAD 0\0", "KEYPAD 1\0", "KEYPAD 2\0", "KEYPAD 3\0", "KEYPAD 4\0",
"KEYPAD 5\0", "KEYPAD 6\0", "KEYPAD 7\0", "KEYPAD 8\0", "KEYPAD 9\0", "MULTIPLY\0",
"ADD\0", "SEPARATOR\0", "SUBTRACT\0", "DECIMAL\0", "DIVIDE\0", "F1\0", "F2\0", "F3\0",
"F4\0", "F5\0", "F6\0", "F7\0", "F8\0", "F9\0", "F10\0", "F11\0", "F12\0", "F13\0",
"F14\0", "F15\0", "F16\0", "F17\0", "F18\0", "F19\0", "F20\0", "F21\0", "F22\0",
"F23\0", "F24\0", "\0", "\0", "\0", "\0", "\0", "\0", "\0", "\0", "NUM LOCK\0",
"SCROLL LOCK\0", "OEM SPECIFIC\0", "OEM SPECIFIC\0", "OEM SPECIFIC\0", "OEM SPECIFIC\0",
"OEM SPECIFIC\0", "\0", "\0", "\0", "\0", "\0", "\0", "\0", "\0", "\0",
"LEFT SHIFT\0", "RIGHT SHIFT\0", "LEFT CONTROL\0", "RIGHT CONTROL\0", "LEFT MENU\0",
"RIGHT MENU\0", "BROWSER BACK\0", "BROWSER FORWARD\0", "BROWSER REFRESH\0",
"BROWSER STOP\0", "BROWSER SEARCH\0", "BROWSER FAVOURITES\0", "BROWSER HOME\0",
"VOLUME MUTE\0", "VOLUME DOWN\0", "VOLUME UP\0", "NEXT TRACK\0", "PREVIOUS TRACK\0",
"STOP MEDIA", "PLAY PAUSE MEDIA\0", "START MAIL\0", "SELECT MEDIA\0", "START APP 1",
"START APP 2", "\0", "\0", "OEM 1\0", "PLUS\0", "COMMA\0", "MINUS\0", "PERIOD\0",
"OEM 2\0", "OEM 3\0", "\0", "\0", "\0", "\0", "\0", "\0", "\0", "\0", "\0", "\0",
"\0", "\0", "\0", "\0", "\0", "\0", "\0", "\0", "\0", "\0", "\0", "\0", "\0", "\0",
"\0", "\0", "OEM 4\0", "OEM 5\0", "OEM 6\0", "OEM 7\0", "OEM 8\0", "\0",
"OEM SPECIFIC\0", "OEM 102\0", "OEM SPECIFIC\0", "OEM SPECIFIC\0", "PROCESS\0",
"OEM SPECIFIC\0", "\0", "\0", "\0", "\0", "\0", "\0", "\0", "\0", "\0", "\0", "\0",
"\0", "\0", "\0", "\0", "ATTN\0", "CRSEL\0", "EXSEL\0", "ERASE EOF\0", "PLAY\0",
"ZOOM\0", "\0", "PA1\0", "CLEAR\0", "\0" };
As you can see there are some old key codes there as well as some called OEM something, which are different for
different languages, so they are hard to set anything specific on. When I started to use the table for conversion I
noticed that some key defines were missing so I added these as well:
// The virtual keys for volume control doesn't seem to be defined,
// so I'm adding them manually here.
#define VK_VOLUME_MUTE 0xAD //Virtual keycode for sound mute
#define VK_VOLUME_UP 0xAF //Virtual keycode for volume up
#define VK_VOLUME_DOWN 0xAE //Virtual keycode for volume down
Well, that's all about that! Happy key conversion!
The Windows Main Game Loop
After reading some books on game programming I have noticed that several of them seems to have an
inefficient main game loop. Most of them only process one Windows message each frame and some of them
even uses the GetMessage call for message processing. Processing the complete message queue every frame is
a very quick operation and I haven't seen any problems with it. The GetMessage call waits for a message if the
queue is empty, and will put the thread to sleep if no message is there. In my opinion you'll have a better main game
loop if you do like this:
MSG msg;
//Windows message structure
PeekMessage (&msg, NULL, 0, 0, PM_NOREMOVE); //Read message in queue without removing it
while (msg.message!=WM_QUIT) //Process messages until we quit
{
while (PeekMessage (&msg, NULL, 0, 0, PM_REMOVE)) //While messages in queue, first remove
{
TranslateMessage
(&msg);
//Then translate the message...
DispatchMessage
(&msg);
//And dispatch it to the callback function
}
// Here we do our game stuff
}


